Error: file is encrypted or is not a database
[sameera@gemini test2]$ sudo yum clean
Loaded plugins: fastestmirror, refresh-packagekit, security
Error: clean requires an option: headers, packages, metadata, dbcache, plugins, expire-cache, rpmdb, all
[sameera@gemini test2]$ sudo yum clean all
Loaded plugins: fastestmirror, refresh-packagekit, security
Cleaning repos: base epel extras linuxtech-release rpmforge updates
Cleaning up Everything
Sunday, June 16, 2013
Tuesday, April 16, 2013
PPTP VPN server Linux
Step 1. Install PPTPD
If your OS is CentOS/RedHat 5:
Step 6. Configure firewall
If you are using CSF firewall, you may refer to this post on firewall settings.
Step 7. Start PPTP VPN server
If your OS is CentOS or Redhat, using the following command:
If your OS is Ubuntu, you just reboot your machine.
Now you can test the VPN server from any client: Windows PCs, Linux PCs, Android phones/tablets, or iPhone and iPad.
The log of the VPN server, by default, is combined with system log located at /var/log/messages.
If your OS is CentOS/RedHat 5:
If your OS is CentOS/RedHat 6:yum install ppp
cd /usr/local/src
wget http://poptop.sourceforge.net/yum/stable/packages/pptpd-1.3.4-2.rhel5.x86_64.rpm
rpm -Uhv pptpd-1.3.4-2.rhel5.x86_64.rpm
If you are using Ubuntu:yum install ppp
cd /usr/local/src
wget http://poptop.sourceforge.net/yum/stable/packages/pptpd-1.3.4-2.el6.x86_64.rpm
rpm -Uhv pptpd-1.3.4-2.el6.x86_64.rpm
apt-get install pptpd
Step 2. Edit IP setttings in /etc/pptpd.confvi /etc/pptpd.conflocalip 192.168.0.1Step 3. Add user account in/etc/ppp/chap-secrets (assign username and password)
remoteip 192.168.0.101-200
vi /etc/ppp/chap-secretsusernameForuser1 * setpassword1here *Step 4. Optional settings in /etc/ppp/options.pptpd
usernameForuser2 * setpassword2here *
vi /etc/ppp/options.pptpdms-dns 8.8.8.8Step 5. Enable network forwarding in /etc/sysctl.conf
ms-dns 4.4.4.4
vi /etc/sysctl.confnet.ipv4.ip_forward = 1use the following command to apply the change:
sysctl -pStep 6. Configure firewall
iptables -A INPUT -i eth0 -p tcp --dport 1723 -j ACCEPTiptables -A INPUT -i eth0 -p gre -j ACCEPTiptables -t nat -A POSTROUTING -o eth0 -j MASQUERADEiptables -A FORWARD -i ppp+ -o eth0 -j ACCEPTiptables -A FORWARD -i eth0 -o ppp+ -j ACCEPTservice iptables saveservice iptables restartIf you are using CSF firewall, you may refer to this post on firewall settings.
Step 7. Start PPTP VPN server
If your OS is CentOS or Redhat, using the following command:
service pptpd restartTo start PPTP Daemon automatically when rebooting next time, use command:
chkconfig pptpd onIf your OS is Ubuntu, you just reboot your machine.
Now you can test the VPN server from any client: Windows PCs, Linux PCs, Android phones/tablets, or iPhone and iPad.
The log of the VPN server, by default, is combined with system log located at /var/log/messages.
Monday, April 8, 2013

Wednesday, February 6, 2013
How to recover cisco switch port from err-disable state
Port is in err-disable state? And you don't know what to do?
switch01#show int G1/0/19
GigabitEthernet1/0/19 is down, line protocol is down (err-disabled)
Find out the main reason for err-disable state. In our case it is port security violation on port Gi1/0/19.
#show interfaces status err-disabled
Port      Name               Status       Reason
Gi1/0/19  SERVER01    err-disabled psecure-violation
Gi1/0/46                     err-disabled psecure-violation
Gi2/0/12                     err-disabled psecure-violation
Fix port configuration:
int G1/0/19
 no switchport port-security
 shut
 no shut
Wednesday, January 30, 2013
activate windows 7 command line
- Open up an elevated command prompt.
- Enter the following
slmgr -ipk your-mak-key-here

slmgr -ato
Monday, August 6, 2012
vi / vim show line number command
To display line numbers along the left side of a window, type any one of the following:
or
:set numberor
:set nu
(Fig.01: Vi / Vim line numbers in action - click to enlarge image)
To turn off line number again enter the same command:
:set nu!If you need number every time you start vi/vim, append following line to your ~/.vimrc file:
set numberHow to forward mail to an external email address
In Exchange Server 2003, mail for a recipient can be forwarded to an alternate recipient by modifying the recipient’s Delivery Options in ADUC | recipient -> properties | Exchange General tab.
Figure 1: Use Delivery Options to auto forward email to an alternate recipient in Exchange 2003
Forwarding mail to an external address in Exchange 2010 and Exchange 2007 Create a MailContact
 Forward mail for a recipient to the MailContact
Automatic forwarding and Remote Domains
Figure 3: The Allow automatic forward setting for remote domains only impacts client-side automatic forwarding using mechanisms like Inbox Rules, and is disabled by default.
Figure 1: Use Delivery Options to auto forward email to an alternate recipient in Exchange 2003
Forwarding mail to an external address in Exchange 2010 and Exchange 2007
Create a MailContact- Expand Recipeint Configuration | Mail Contact
- In the Action pane, click New Mail Contact
- To create a new Contact object, leave the default (New Contact) selected | click Next
- Type First name, Last name
- Click Edit to add the external email address
- Click New to complete creation of new MailContact
Forward mail for a recipient to the MailContact- Expand Recipeint Configuration | Mailbox | select mailbox | properties | Mail Flow Settings tab | Delivery Options
- Under Forwarding address, select Forward to
- Click Browse to select the MailContact
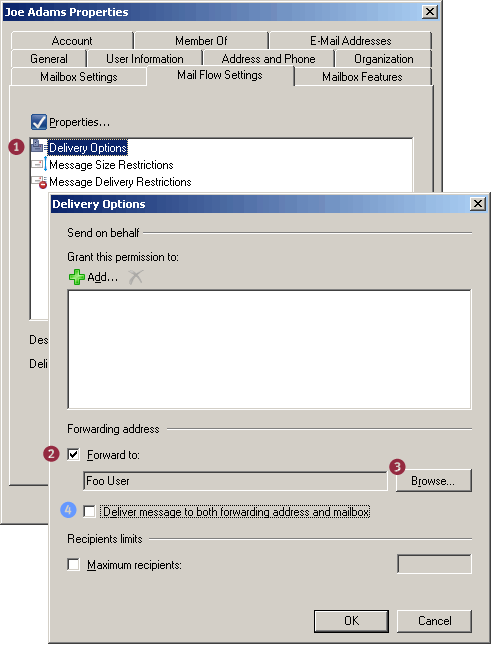
- Figure 2: Modifying Delivery Options to forward email to an alternate recipient
- Optional: If a copy of the message needs to be delivered to both the external recipient and the original recipient’s mailbox, select the Deliver message to both forwarding address and mailbox
Automatic forwarding and Remote Domains
Figure 3: The Allow automatic forward setting for remote domains only impacts client-side automatic forwarding using mechanisms like Inbox Rules, and is disabled by default.

If you need to forward mail to an external email address, you can’t simply type the address in theForward to: field on the Delivery Options page. A (mail-enabled) Contact needs to be created in ADfirst, and Delivery Options modified to point to the Contact.
In Exchange 2010/2007, these tasks remain the same. However, instead of using ADUC to accomplish them, you use the EMC or the Shell (aka “EMS“). The new term for a Contact is MailContact.
Create a MailContact using the EMC:
Alternatively, use the Shell to create a new MailContact:
New-MailContact -Name “Foo User” -ExternalEmailAddress “foo@externaldomain.com
Next, we set the recipient’s Delivery Options to deliver to the alternate recipient.
Now that we have a MailContact created for the external recipient’s email address, we can forward mail for the Exchange recipient to the MailContact. To configure mail forwarding using the EMC:
To configure mail forwarding using the Shell:
Set-Mailbox “Joe Adams” -ForwardingAddress “foo@externaldomain.com”
To deliver a copy to the mailbox (in addition to the external email address – equivalent of step 4 above):
Set-Mailbox “Joe Adams” -ForwardingAddress “foo@externaldomain.com” -DeliverToMailboxAndForward $true
This command lists mailboxes with auto forwarding enabled:
Get-Mailbox | where {$_.ForwardingAddress -ne $null} | ft name,forwardingaddress
Remote Domains define a bunch of settings, such as message formats, character sets, and OOFSfor messages sent to specified domains outside your Exchange organization. The default Remote Domain setting for the address space * (the asterisk character) applies to all external domainsexcept the ones for which you’ve created a Remote Domain for.
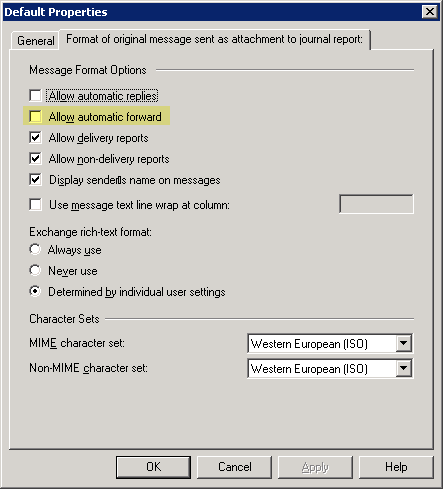
The Allow automatic forward setting for remote domains applies only to client-side forwardingusing mechanisms like Inbox Rules. For instance, if a user creates a rule in Microsoft Outlook to automatically forward mail to an external email address, the default setting (for address space *) doesn’t allow it. To enable automatic client-side forwarding of mail to external addresses, select the Allow automatic forward checkbox in a remote domain’s properties | Format of original message sent as attachment to journal report tab (Yes, in Exchange 2007 the tab is mislabeled. It is the “Message Formats” tab… :).
Server-side email forwarding configured by an administrator, as shown in this post, is not impacted by this setting.
Subscribe to:
Posts (Atom)